Tuesday, February 28, 2012

Timelines

We've been working on Non-Fiction characteristics of text in class. One of our focus skills has been on sequencing events. For a project tie-in, students completed picture timelines. Students re-capped significant events in their lives on poster board, included photos and captions, and presented their timelines to class. So fun! Check out photos below. This fantastic idea came from Ashleigh.

Here is a copy of my parent letter home, and the student checklist I used for assessment.


Book Making & Harris Burdick

We've been doing a fabulous project in class. In an effort to integrate some art and creative writing, I used prints from The Mysteries of Harris Burdick by Chris Van Allsburg to inspire student stories. I mean, what better images are there to spark ideas? If you haven't seen these images or read this book, click HERE to preview this book at Amazon. I've never had students so excited about writing!

After reading the story and discussing the images, students chose one image to write a story about. To incorporate a fun way of publishing, students are making mini books to write their stories. Fun! Check out our work and resources below.

Have you seen this yet? Well-known authors wrote a story to accompany one of the images from The Mysteries of Harris Burdick. My students loved reading the story from Kate Dicamillo. Check it out HERE.

Anchor Text

Our display of the Harris Burdick images. Students did a silent art walk, and then we discussed each print and read the book.

Students working on their story.


Instructions on making the boxes:

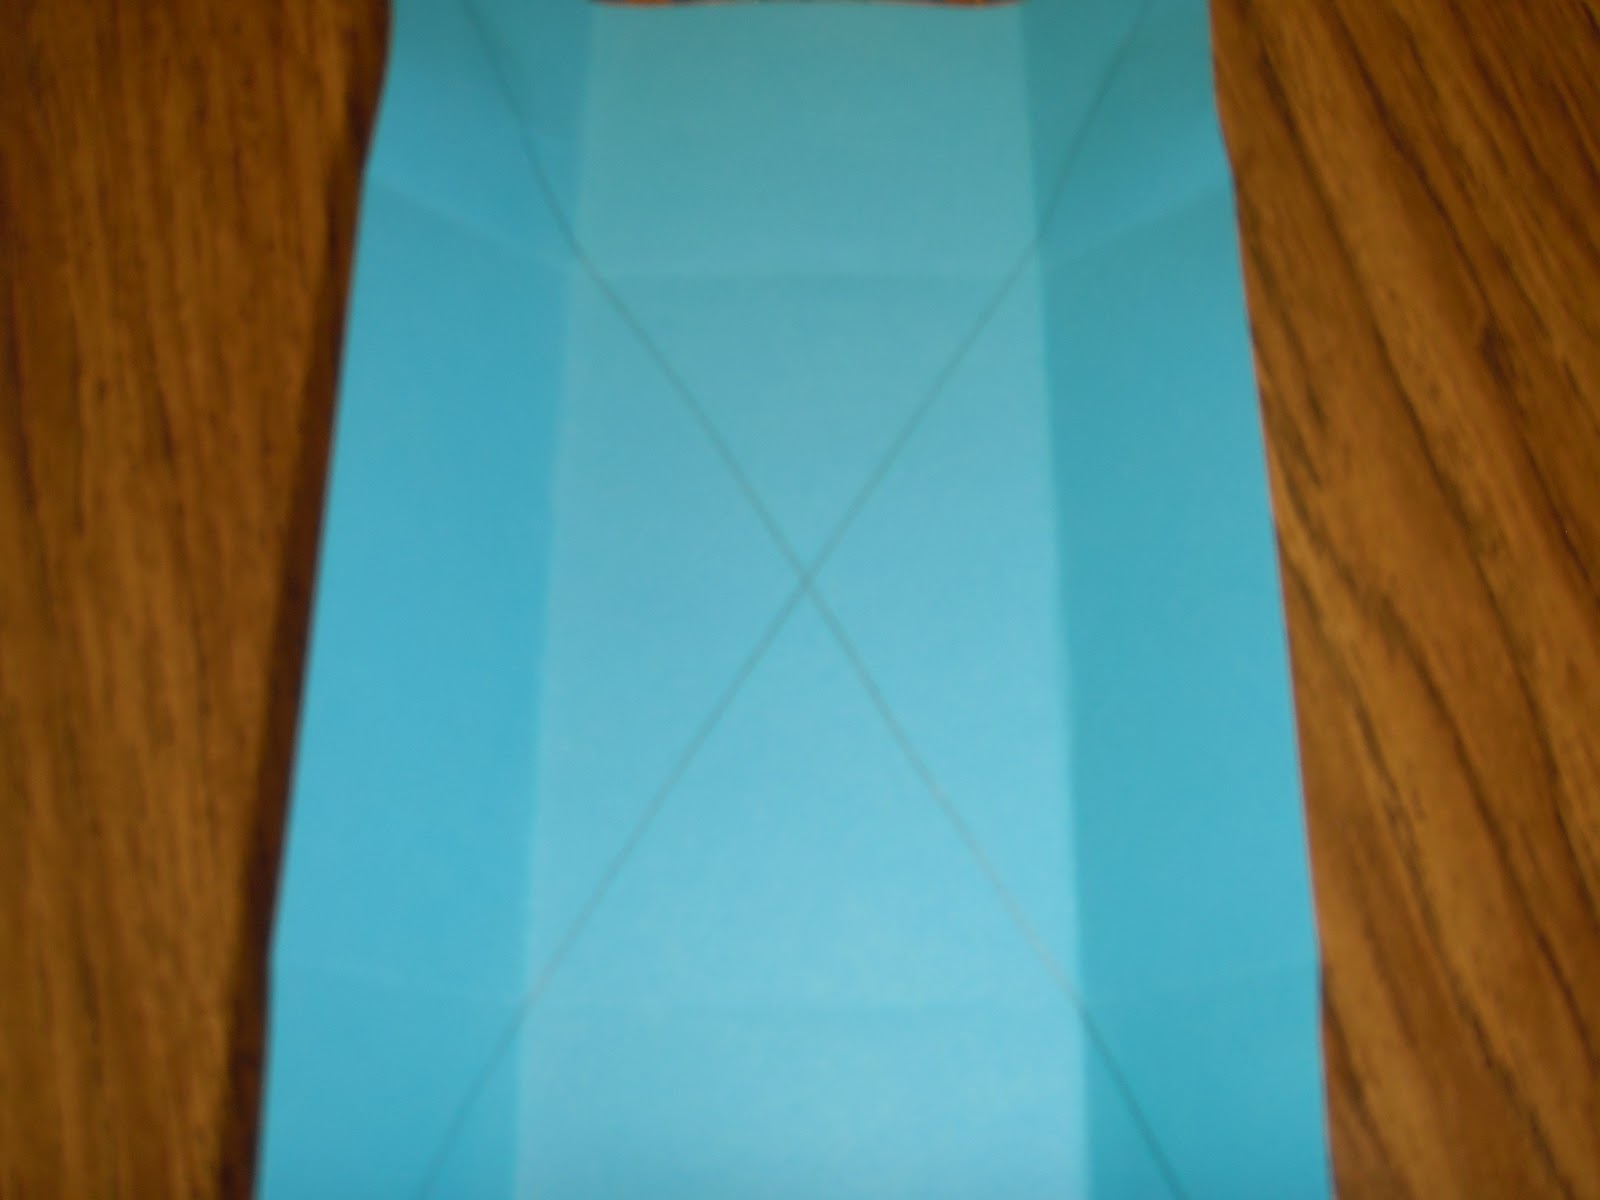
Start with two rectangles, 8 1/2 by 5 1/2. Turn paper so that short edges are on top and bottom. Draw an X with a ruler, connecting diagonal corner to corner.


Find the center of the X. Fold up one edge to the center.

Turn paper and fold up the other edge to center. It should like like this when both edges are folded to the center.

Turn paper so that long edge is now on top and fold up long edge to center. Contine with the other side.
It should look like this once you've done all the folds. You should have four smaller rectangles, made by the folds, in each corner.
Now, make a cut on all four corners on the fold line, up to the top fold line. You'll see my scissors on the left. That's the line you cut on, and also where you end the cut.

Repeat on all four corners. It should like like this when all four corners have been cut.


Now take the two outer flaps that you've created from the cuts. You'll glue these together first.

Add glue to one of the flaps...

And paste the two strips together, so that the box maintains its shape with the fold lines.
Now, take the last piece hanging out, add glue, and fold it up and bend it over the edge of the two tabs.
One more side to go!

Your box is complete!


Repeat with another piece of paper the same size. You have a top and bottom for the box.

Now, for the inside strips. Start with two strips of paper, 11" x 4"
Fold the paper in half.

Now, fold one part of the half toward you, meeting the bottom edge of the fold.


Turn it over and repeat. Pull the remaining half toward you down to the edge of the fold.

This is what it should look like once you've unfolded.

Repeat so that you have two completely folded strips.
Glue the end panel on one of the strips.

Place the ending panel on the other strip on top to seal together.


Completed, glued strip.

Write, draw, etc.

Now, take the top of your box, and add a lot of glue.

Add the first page of your strip, and push to seal.

Take the bottom of the box, and repeat, gluing the last panel of the strip.

Ta Da!
Carefully fold up the strip inside of the box, and place top and bottom together (you'll need to do some "fedangling" to get them to fit together).

Add a title to the top, and cover art if desired. Open at any time to reveal inside of book!


One more image of how students are publishing their stories on their strips.


Finished student books to come!


Thursday, February 23, 2012

For Parents: Art Night Extras

Here is a copy of the Art Night flyer if you need an extra. You can also print from this Google Doc Link. I hope you can all make it!

Wednesday, February 22, 2012

Time Capsules

In third grade social studies, we've been studying how communities change over time. As one of the culminating activities, students brainstormed items that would be meaningful enough to include in a time capsule to be opened a century from now. What types of items would really show future generations what life was like in 2012?

You can find the Google Doc version HERE.


Tuesday, February 21, 2012

Math Menus

I recently started using Math Menus in class, tailored to specific skills. This is perfect for those days that I need to complete more intensive interventions with groups of students and I need other kids to be more self-directed. This can be tailored for other math games or activities, also! I'm currently working on multiplication and fractions Menus.

You can find the link for the Google Doc version HERE.


Parade of Objects

For this art activity, students practiced their art criticism skills. We started by just looking at the print, "Parade of Objects" by Jean Debuffet, and responding to what we saw. My favorite response? Lauren said, "It looks like a bunch of robots sitting around the table eating lasagna." :)  Students also commented on color, line, and shape.

 Next, students focused on how it made them feel. Kolby said it made him feel "stressed". Many students agreed with that idea.

To close the lesson, I invited students to see if they could "make" objects out of the shapes in the art print. Students were quickly able to identify several objects including food items, animals, and other items. We discussed how we can easily make identifiable items without intending to.

Students then took this idea back with them to their seats. We started by just drawing a line design over a blank sheet of white construction paper. No pencils, only Sharpies! This had students worrried. They also had to make a continuous line that covered their paper, no stopping. When students completed this step, they were encouraged to find a few spots where they could identify some objects. Students turned their shapes into dogs, fish, people, etc. They finished by incorporating color, a focal point, and lines as Jean Debuffet did in his own print. Fun! Check out our work below.

The Original: Parade of Objects by Jean Debuffet